Up and running with RaspberryPi with Docker
How to configure RaspberryPi with docker and docker-compose. I am personally using it for my local hone projects where I can run these projects without interfering RaspbianOS image.
System Requirements
- Raspberry Pi 4 (for better performance)
- 32GB memory card
- LAN cable to connect your RaspberryPi with local network
Installation
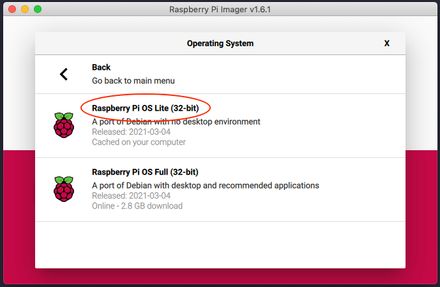
The first step is to install the Raspbian OS image on your memory card. I would suggest going with RaspberryPi official page to download the Raspberry Pi Imager. I recommend using this imager because it can directly fetch the latest OS image from RaspberryPi’s website.

Select OS while formatting your SD card
After installing it, you need to enable your RaspberryPi with ssh. Go to your SD card drive and create an ssh file by typing the touch ssh command. This file will enable ssh so you can access it throughout your home network.
It is advisable to update the app of the packages after initial installation.
# log into your RaspberryPi with default password: raspberry
$ ssh pi@ip-address-of-your-rpi

# update and upgrade all local packages
$ sudo apt-get update
$ sudo apt-get upgrade
Assign static IP (optional)
It is always easy to work with static IP. You can assign a static IP address to your RaspberryPi to open the application from the same IP. Following are the steps which you can follow to setup:
# Open following file
$ sudo nano /etc/dhcpcd.conf

# Add following lines at the top of the file
interface eth0
static ip_address=192.168.0.4/24  # In my case, static IP address is: 192.168.0.4
static routers=192.168.0.1  # Add your router's IP address
static domain_name_servers=8.8.8.8 8.8.4.4  # Default Google DNS
To reflect the changes, please reboot your RaspberryPi with sudo reboot.
Install docker
After assigning static IP, you can now proceed with docker installation.
Step 1
Download the docker bash file on your local and run it with sudo.
# It will download the docker installation file and save it as get-docker.sh
$ curl -fsSL https://get.docker.com -o get-docker.sh

# Now run the installation docker command
$ sudo sh get-docker.sh
Step 2
It will take some time to install docker. Once it’s done, you can now add your user to the docker group, which is an optional step but helps you run docker commands without adding sudo it.
$ sudo usermod -aG docker ${USER}

# Be Careful, now onwards you will run all the commands with sudo rights
$ sudo su - ${USER}
Step 3
Once it’s done you can now run docker --version it should show the installed version.
# In my case
Docker version 20.10.6, build 370c289
You can also try to run a hello-world docker image with the following command:
$ docker run hello-worldInstall docker-compose
For large-scale projects or where you need multiple docker images to run or containers, you need a tool called docker-compose. It allows you to run your Docker images behind the scene.
First, you need to install the docker-compose by typing the following command:
Make sure you have
python3andpython3-pip.
# to install python3 and python3-pip
$ sudo apt-get install -y python3 python3-pip
$ sudo pip3 install docker-composeThanks for following the tutorial, happy coding!