How to secure a Raspberry Pi on your network
If you are planning to expose your RaspberryPi over the internet, you should consider these security guidelines.
Installation permalink
Use the official Image tool: You often find RaspberryPi images online from various sources. When it comes to security and privacy I would consider the official RaspberryPi imager to install RaspberryPi OS.
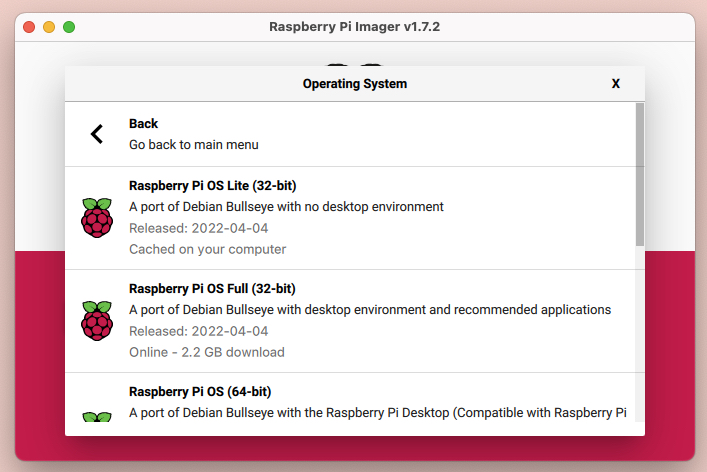
OS selection in Raspberry PI Imager
Password and SSH: Use advance options and change the default password. In case you are going to use it with SSH then consider enabling it while the installation process itself.
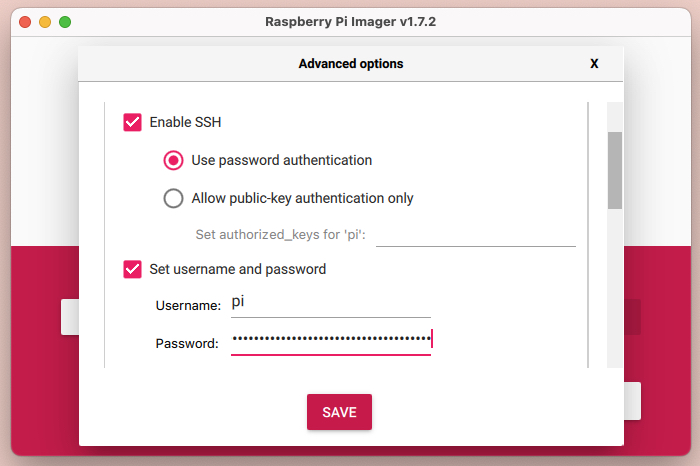
Enabling SSH and new password from Advanced options
However, you can later add
SSHoption by creatingsshfile (without any extension) on the root.
Update and Upgrade all packages: The fact of having an open-source system is you will get lots of updates, I would recommend updating packages even after a fresh install. Log in with SSH and perform sudo apt update -y && sudo apt upgrade -y this command will first pull a list of the latest packages and followed by the installation.
Note: If you want to check what all packages are being installed, simply remove -y from the end of both commands.
Auto Updates permalink
In the above-mentioned command, I showed you how to install the latest packages, but you need to do it manually. What if I give you an option where you don't need to perform manually but your Raspberry Pi will do it for you like Windows/Ubuntu.
# Install following package
$ sudo apt install unattended-upgrades -y

# After installation open following file
$ sudoedit /etc/apt/apt.conf.d/50unattended-upgrades

# Add following given two lines
"origin=Raspbian,codename=${distro_codename},label=Raspbian";
"origin=Raspberry Pi Foundation,codename=${distro_codename},label=Raspberry Pi Foundation";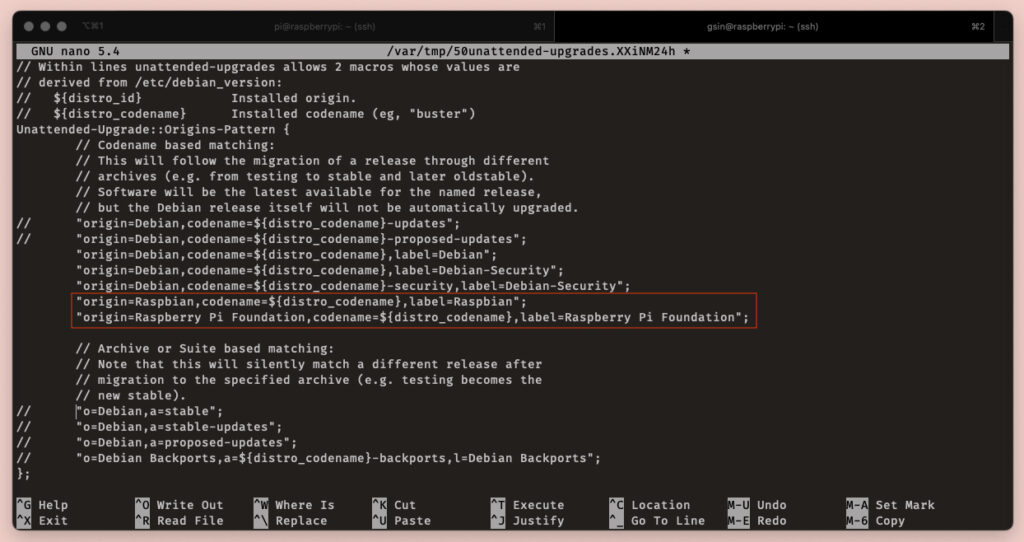
Adding auto-update script configurations
These two lines will enable the package to pull the latest updates from Raspberry Pi official distros.
User Management permalink
Since now we are up to date with our packages and auto-updates, it's time to set up user rights.
Raspberry Pi comes with a default user pi which every hacker is aware of. To get rid of the obvious chance to get hacked is to create a new user.
# First, create new user (gurpreet is a new user)
$ sudo adduser gurpreet

# Now add your user to the admin group
$ sudo gpasswd -a gurpreet adm

# Also, provide sudo access to your user
$ sudo gpasswd -a gurpreet sudo
I would suggest to test newly created user by opening new terminal window and try login, before closing your existing window.
Try: sudo whoami to check sudo user and it should return root as output.
Job is not done here, we need to lock the default pi user as well.
$ sudo passwd -l piIt will lock pi the user. We will not delete this user since some packages have pi user hard-coded users to perform admin-related operations.
Firewall setup permalink
After user management, you are quite safe than a normal Raspbian setup. Before opening your Raspberry Pi over the network, you should perform the following steps.
By default Raspberry Pi has open lots of ports for communication, sometimes hackers use these ports to get into your Raspberry Pi. In order to check, you can perform netstat -an command and see how many ports are open.
There are some packages that you can install to add a firewall, sometimes it gets very difficult to set up. I would recommend a package called UFW which is quite easy to set up and is being widely used by industry-leading hosting companies like Digital Ocean.
$ sudo apt install ufw -yAfter the installation, enable SSH as a very first thing because I believe you will be logged in via SSH.
$ sudo ufw allow 22/tcp comment "SSH"Default SSH port is 22 hence we need to enable it first. Tip: You can put a comment at the end, it will help you to understand the reason for enabling it when you open multiple ports.
You simply add more ports to the list, like 80/tcp for any web server related operation like
Nginx, etc...
After adding all required ports, please enable ufw the firewall by triggering the following command.
$ sudo ufw enableIt will immediately enable defined firewall rules on your Raspberry Pi. You can anytime check these defined rules with a command.
$ sudo ufw status numbered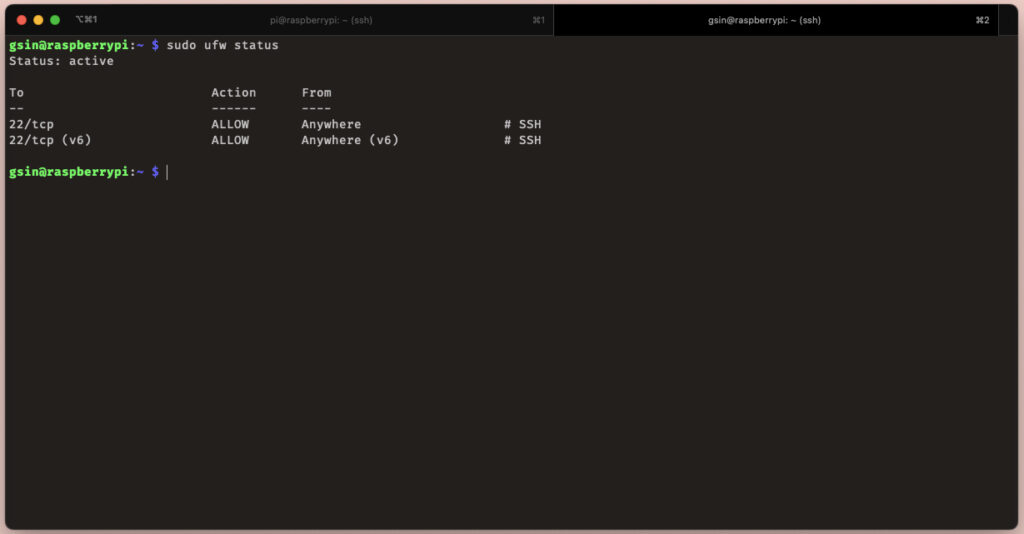
ufw status command output
Important: Before exiting, test your firewall setup by login in in new tab.
Prevent brute-force attack permalink
After enabling our Raspberry Pi with firewall protection, I would still recommend enabling brute-force protection.
These days systems are capable enough to perform millions of calculations in a fraction of seconds. Hence some hackers are using such CPU processing to guess passwords. If your password is easy to guess, there could be a chance you were attacked by a brute-force attack.
To prevent our Raspberry Pi from a brute-force attack we need to install another package that will protect it from it.
$ sudo apt install fail2ban -yAfter installing it you need to configure it for your personal use.
# Open fail2ban configuration file

$ sudoedit /etc/fail2ban/jail.local
# Add following information
[DEFAULT]
bantime = 1h
banaction = ufw
[sshd]
enabled = trueThe above profile will disable the access for such users which are trying to guess your password more than 5 times.
Once you are done, please enable the service sudo systemctl enable fail2ban
Useful commands permalink
$ sudo systemctl --type=service // List of all services
$ sudo systemctl --type=service --status=active // List of all active services
$ sudo systemctl disable <service-name> // Disable service
$ sudo systemctl enable --now <service-name> // It will enable the given service (right away, you don't have to restart pi)