Day 5 - Your first week in NodeJS
As promised, this is my fifth article of Your first week in NodeJS web article series.
Prerequisite
- Day 1 - Your first week in NodeJS
- Day 2 - Your first week in NodeJS
- Day 3 - Your first week in NodeJS
- Day 4 - Your first week in NodeJS
Quick recap
In my previous article, I explained how to implement a template engine to get dynamic variables into your HTML file.
We used static data to show and save users in memory, now we will connect our application to MongoDB for better features and sustainability.
What is NoSQL?
Big data changed how we used to think of databases and storage, we used to have relational databases like MYSQL, SQLServer, etc. but now we have another technique to store data called NoSQL.
It stores data in documents in the form of JSON, instead of tables with rows and columns and it works very well with JavaScript (Node.js). This is what data looks like in the MongoDB database.
[
  {
    "_id": "610ec10c78f7665bfa2cbf11",
    "age": 28,
    "name": "Bobbi Cannon",
    "email": "bobbicannon@dragbot.com"
  }
]
When we are not sure about the data structure or what kind of data is expected we can blindly choose the NoSQL approach and the industry-leading option is to go with MongoDB.
MongoDB Integration
We will be using MongoLabs for our MongoDB database setup which comes with the free tier option.
You can go to https://account.mongodb.com/account/login and claim your free account. You can follow the given steps to create a new database.
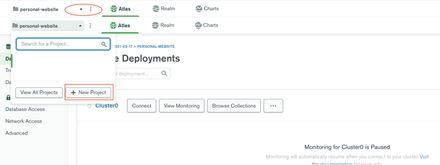
Create a new project
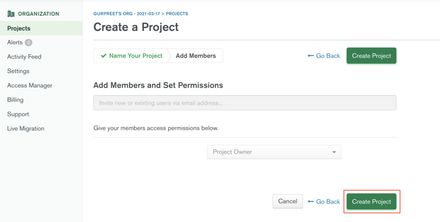
Save project with members (default is logged-in user)
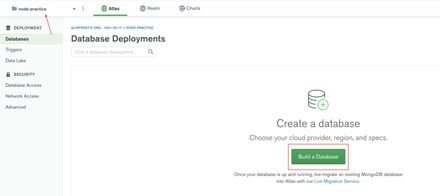
Create your first database
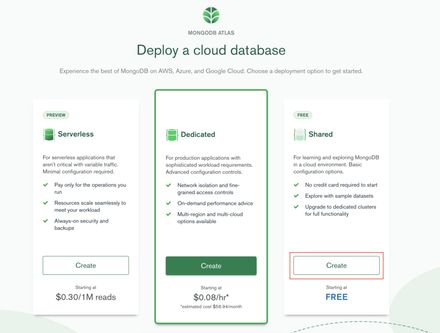
Select free plan
Once you create your cluster, it will take some time for the initial deployment.
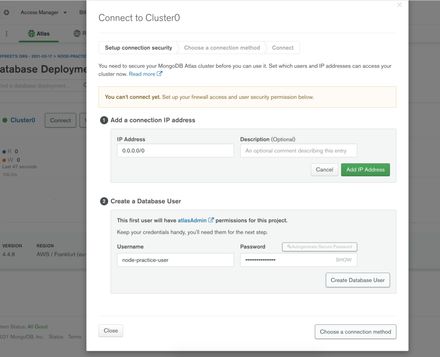
Now you need to create a user for your database
MongoDB Integration
Now your database is ready with username/password. Let’s install the mongoose npm package on our local. $ npm install mongoose
Note: To save your MongoDB details, you need to have a file with the name .env, which allows you to send these values in process.env or Node.js environment variables.
MONGO_HOST=my_hostname
MONGO_PASS=my_password
MONGO_USER=my_username
MONGO_DB=my_db_name
You will get above information in MongoDB connect option like
mongodb+srv://my_username:my_password@my_hostname/my_db_name?retryWrites=true&w=majority
After creating the .env file you need to install a couple of packages, please refer to the package.json file below:
{
  "name": "node",
  "version": "1.0.0",
  "description": "",
  "main": "app.js",
  "scripts": {
    "start": "nodemon app.js"
  },
  "keywords": [],
  "author": "",
  "license": "ISC",
  "dependencies": {
    "body-parser": "^1.19.0",
    "dotenv": "^10.0.0",
    "ejs": "^3.1.6",
    "express": "^4.17.1",
    "mongoose": "^5.13.5",
    "nodemon": "^2.0.12"
  }
}
Now we are ready to change our app.js file with MongoDB changes.
First, you need to require the dotenv package to get MongoDB credentials from .env or process.env.
require("dotenv").config()After requiring the package you will get access to all environment variables like this: const { MONGO_USER, MONGO_HOST, MONGO_PASS, MONGO_DB } = process.env;
Now we will connect the application with MongoDB, it requires the below steps:
require('dotenv').config();
const mongoose = require('mongoose');

// connect to the database
async function connectDB() {
  const {MONGO_USER, MONGO_HOST, MONGO_PASS, MONGO_DB} = process.env;
  await mongoose.connect(
    `mongodb+srv://${MONGO_USER}:${MONGO_PASS}@${MONGO_HOST}/${MONGO_DB}`,
    {
      useNewUrlParser: true,
      useUnifiedTopology: true,
      useFindAndModify: false,
      useCreateIndex: true
    }
  );
}

connectDB();
We need to require the mongoose package, and then followed by mongoose.connect() we will connect our current to our MongoDB instance.
It’s an async operation, you can use promise or async/await functions.
Once you are done with the connection, we will define our Schema and Modal.
Schema is required to let MongoDB know what kind of collections you are going to store into documents.
// Create Schema for users
const usersSchema = new mongoose.Schema({
  age: Number,
  name: String,
  email: String
});

// Create Modal for users
const UsersModal = new mongoose.model('users', usersSchema);
As I explained in my previous article,
_idwill be autogenerated by MongoDB.
Please refer to the following updated app.js file (reset of the project setup will remain the same):
require('dotenv').config();
const express = require('express');
const bodyParser = require('body-parser');
const mongoose = require('mongoose');
const app = express();

// connect to the database
async function connectDB() {
  const {MONGO_USER, MONGO_HOST, MONGO_PASS, MONGO_DB} = process.env;
  await mongoose.connect(
    `mongodb+srv://${MONGO_USER}:${MONGO_PASS}@${MONGO_HOST}/${MONGO_DB}`,
    {
      useNewUrlParser: true,
      useUnifiedTopology: true,
      useFindAndModify: false,
      useCreateIndex: true
    }
  );
}

connectDB();

// Create Schema for users
const usersSchema = new mongoose.Schema({
  age: Number,
  name: String,
  email: String
});

// Create Modal for users
const UsersModal = new mongoose.model('users', usersSchema);

app.set('view engine', 'ejs');

app.use((req, res, next) => {
  res.append('Access-Control-Allow-Origin', ['*']);
  res.append('Access-Control-Allow-Methods', 'GET,PUT,POST,DELETE');
  res.append('Access-Control-Allow-Headers', 'Content-Type');
  if (req.url.includes('/api')) {
    res.append('Content-Type', 'text/json');
  }
  next();
});

// parse application/x-www-form-urlencoded
app.use(bodyParser.urlencoded({extended: false}));
app.use(bodyParser.json());
app.use('/assets', express.static('assets'));

const getUserInfo = id => {
  return USER_DATA.filter(obj => obj._id === id);
};

// Get list of users, and set data
app.get('/', (req, res) => {
  UsersModal.find({}, function (err, docs) {
    if (err) {
      res.status(500).send(err);
    }
    res.render('index', {
      data: docs
    });
  });
});

// Get single user by id, and set data
app.get('/user/:id', (req, res) => {
  UsersModal.findOne({_id: req.params.id}, function (err, doc) {
    if (err) {
      res.status(500).send(err);
    }
    res.render('user', {
      data: doc
    });
  });
});

// Loading view of contact page
app.get('/contact', (req, res) => {
  res.sendFile(`${__dirname}/contact.html`);
});

// RESTFul API Services

// get all users
app.get('/api/users', (req, res) => {
  UsersModal.find({}, function (err, docs) {
    if (err) {
      res.status(500).send(err);
    }
    res.send(docs);
  });
});

// get single user by id
app.get('/api/user/:id', (req, res) => {
  UsersModal.findOne({_id: req.params.id}, function (err, doc) {
    if (err) {
      res.status(500).send(err);
    }
    res.send(doc);
  });
});

// delete single user by id
app.delete('/api/user/:id', (req, res) => {
  UsersModal.findOneAndDelete({_id: req.params.id}, function (err, doc) {
    if (err) {
      res.status(500).send(err);
    }
    res.send(doc);
  });
});

// update single user by id
app.put('/api/user/:id', (req, res) => {
  const {name, age, email} = req.body;
  if (req.params.id) {
    UsersModal.updateOne({_id: req.params.id}, {name, age, email}, function (err, doc) {
      if (err) {
        res.status(500).send(err);
      }
      res.send(doc);
    });
  } else {
    res.status(500).send('id is missing in params');
  }
});

// add new user
app.post('/api/user', (req, res) => {
  const {name, age, email} = req.body;

  if (name && age && email) {
    UsersModal.create(
      {
        age,
        name,
        email
      },
      function (err, doc) {
        if (err) {
          res.status(500).send(err);
        }
        res.send(doc);
      }
    );
  } else {
    res.status(500).send('error, user not added.');
  }
});

app.listen(3000);